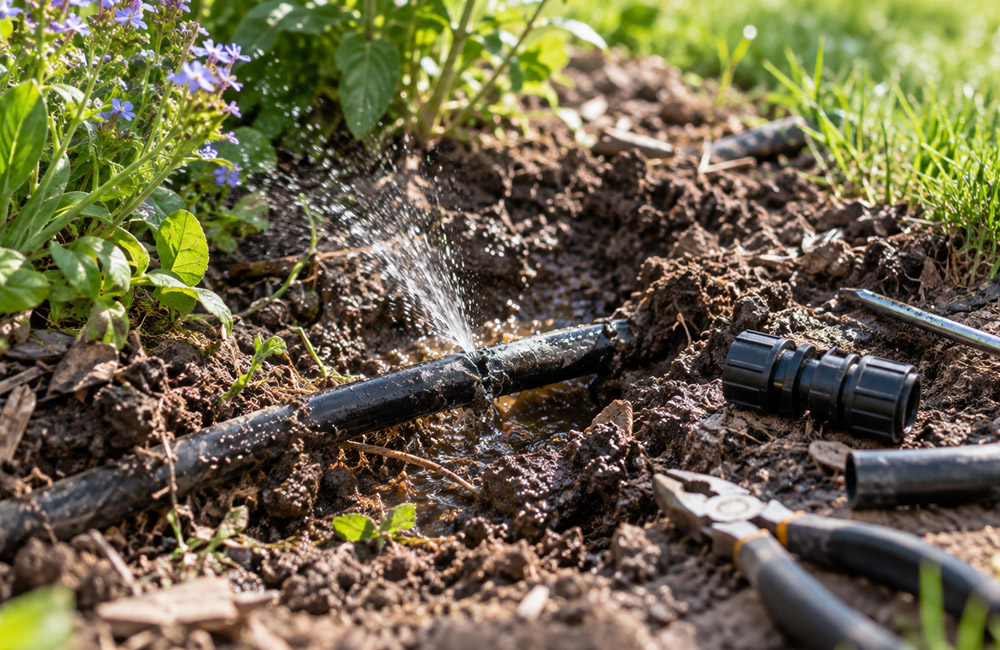
A leaking irrigation line rarely appears as a neatly exposed crack. More often, the first signs are indirect. One section of lawn stays wet after irrigation ends. Several sprinklers lose pressure. Water bubbles through the soil away from the nearest head. A valve box stays unusually wet, or part of a drip zone stops performing normally.
The first wet spot you find is not always the source. Water can move through loose soil, along pipe trenches, beneath mulch, and around roots before reaching the surface. Digging directly under a puddle may expose an intact pipe while the actual break remains nearby.
A reliable repair starts by answering three questions: where is the water escaping, what type of line is damaged, and what caused the failure? Once those are clear, the repair itself becomes easier to choose and complete correctly.
This guide covers common residential irrigation leaks involving PVC pipe, flexible irrigation pipe, and drip tubing. It also explains when a homeowner can reasonably handle the repair and when the problem points to a larger system issue.
Start With the Zone, Not the Shovel
Before excavating, determine which part of the irrigation system is involved.
Run the system manually and observe one zone at a time. Watch the sprinklers or drip outlets while also checking the ground between them. A sudden loss of pressure combined with water surfacing elsewhere can indicate a buried break.
Pay attention to how the leak behaves. A forceful stream or rapidly growing wet area suggests a different problem from a slow seep that appears only after several minutes. In drip irrigation, a puncture or loose fitting may create a very localized wet spot, while a broken sprinkler lateral can move much more water.
If the ground remains wet long after irrigation has been off, do not assume the leak is on a sprinkler lateral. A continuously pressurized mainline, leaking valve, domestic water line, or drainage issue may be involved.
The timing helps narrow the source. Note whether the water appears only when a particular zone runs, whenever the irrigation supply is pressurized, or even when the irrigation system is off.
A Quick Field Diagnosis
| What you observe | What it may suggest |
| Water appears only while one zone operates | Leak may be downstream of that zone valve |
| Several heads in one area suddenly become weak | A leaking lateral may be reducing available pressure and flow |
| Water continues when no zone is running | Investigate the pressurized supply, valves, or another water source |
| One drip connection sprays or drips visibly | Damaged tubing, fitting, emitter, or connection |
| Water collects at a low point after shutdown and gradually stops | Residual drainage may be involved rather than an active leak |
| A valve box remains unusually wet | Inspect the valve and nearby connections first |
These signs are not a final diagnosis, but they help determine where to look.
Isolate the Suspected Section
Once you know which zone or line is involved, stop the water before opening the ground.
Turn off the affected zone and isolate the appropriate water supply if the damaged section can remain pressurized. A leak on a downstream sprinkler lateral may stop when the zone valve closes, while a break on the irrigation mainline can remain under pressure until the larger irrigation supply is shut off.
Allow residual pressure to dissipate before cutting the line.
If the system includes a pump or other equipment that can restart automatically, make sure it cannot restore pressure unexpectedly while the repair is open.
A dry, depressurized work area makes it easier to inspect the damage, prepare the pipe, and keep soil out of open connections.
Locate the Break More Precisely
Surface water can be misleading, especially on sloped properties or in loose soil.
Begin near the strongest evidence, but expose the area gradually. As you approach the expected pipe location, switch to hand tools. Aggressive digging with a shovel can turn a small leak into a larger repair by cutting tubing, damaging control wiring, or striking intact pipe.
Irrigation trenches may contain more than water lines. Wiring for valves can run alongside the piping, and landscapes may also contain lighting cable, drainage components, or other buried utilities.
Expose enough of the line to see it from several directions. A narrow hole that reveals only the top of the pipe can hide a split underneath or a failed fitting just outside the excavation.
Clean away mud and look for the actual escape point. If the break cannot be identified visually, water may need to be restored briefly for observation, provided the area can be watched safely and the excavation will not be damaged by additional flow. Shut the supply off again before beginning the repair.
Identify What Failed Before Cutting Anything
Do not remove a section of pipe until you understand the failure.
Common problems include punctures, longitudinal splits, cracked fittings, separated joints, damaged riser connections, loose tubing connections, and pipe pulled out of alignment.
The condition of the surrounding material matters as much as the visible hole. A clean puncture near the surface may point to a shovel, stake, or edging tool. A fitting that has pulled apart may indicate movement or mechanical stress. A recurring leak near the same joint can justify checking alignment, pressure, and component compatibility before another fitting is installed.
Inspect several inches of pipe on both sides of the failure. If the surrounding material is cracked, distorted, brittle, badly scratched, or otherwise weakened, replace enough of the line to reach sound material.
Confirm the Pipe or Tubing Type
One of the easiest ways to create another leak is to buy a repair part based only on appearance.
Residential irrigation systems may contain rigid PVC, polyethylene pipe, flexible drip tubing, small distribution tubing, or a mixture of materials added during different phases of installation.
Identify the material first. Then confirm its size and connection method.
Flexible irrigation and drip tubing deserve particular attention because actual outside diameter can vary. Two products with similar nominal descriptions may not accept the same fitting.
Take a careful measurement and look for markings on the pipe or tubing. If possible, bring a short piece of the removed damaged material when purchasing a repair component.
A fitting that appears close enough in size can still leak or separate under pressure if it was not designed for that tubing.
Expose Enough Line and Cut Back to Sound Material
A buried repair needs working room.
Excavate far enough around the pipe to clean it, cut it squarely, install the repair component, and inspect the finished connection. Remove soil beneath the line as well as around it so the pipe does not have to be forced sideways during assembly.
Keep excavated soil away from open ends. Dirt entering the line can later reach valves, sprinkler nozzles, filters, or drip emitters.
Once the break is fully exposed, remove enough damaged material to reach sound pipe on both sides. Do not make the cuts immediately beside a crack just to keep the replacement piece short.
Make clean, square cuts where required by the repair method. Ragged or angled ends can interfere with insertion depth, sealing surfaces, or solvent welded joints.
For flexible tubing, use a cutter that does not crush or deform the end. For rigid plastic pipe, remove burrs and loose fragments without reducing the pipe wall excessively unless the fitting instructions require specific preparation.
Inspect the remaining material again after cutting. A crack can extend farther than it first appeared.
Choose the Repair Method for the Actual Line
There is no universal fitting for irrigation repairs.
Rigid PVC may require solvent welded fittings, an appropriate repair coupling, or another component designed for that pipe. Flexible irrigation pipe may use a different connection method. Drip tubing may use compression, insert, barbed, or other fittings depending on its dimensions and product family.
For compatible drip tubing, compression fittings for irrigation can provide a practical way to reconnect the line after a damaged section has been removed. NDS Pro, for example, offers compression couplings in several drip tubing sizes. Its fittings use internal retention features designed for specific tubing dimensions, which is why compatibility matters.
NDS also manufactures larger compression fittings and repair couplings for other plastic pipe applications. Those products should not be confused with small drip tubing fittings simply because both use the word compression.
Where rigid PVC cannot be moved easily, an expansion or telescoping repair coupling may provide the needed adjustment. Products such as NDS Pro Span repair couplings are designed for replacing damaged sections of PVC irrigation pipe where the existing ends have limited movement. Installation should follow the instructions for the specific coupling and solvent cement system being used.
Select the fitting for the pipe, size, operating conditions, and available working space rather than trying to make the existing line fit whatever repair part is convenient.
Check Alignment Before Completing the Connection
Before joining the repair, look along the pipe from both directions.
The existing ends should meet naturally within the limits of the selected fitting. If one section has to be pulled sideways, pushed downward, or held under constant force to make the connection, enlarge the excavation and correct the alignment first.
Roots, soil movement, previous repairs, or tight trenches can place buried lines under mechanical stress. A coupling should connect the pipe, not hold two misaligned sections together permanently.
Support the repaired section so it is not suspended over a void or resting against a sharp rock. Once backfilled, the surrounding soil should support the pipe without placing concentrated force on the new joint.
Handle PVC Repairs as a Surface Preparation Job
If the damaged line is rigid PVC and the repair uses solvent welded fittings, preparation is as important as the fitting itself.
Cut the pipe to the dimensions required by the repair arrangement. Remove mud and standing water from the work area and prepare the pipe and fitting according to the instructions for the primer and solvent cement being used.
Do not guess at cure time.
Temperature, humidity, pipe size, system pressure, and the solvent cement product can affect how long a joint should cure before pressure is restored. Follow the product instructions.
A joint can feel firm by hand before it is ready for full pressure service.
Flexible Tubing Needs Clean Cuts and Full Insertion
Flexible tubing repairs use a different connection method, but preparation still matters.
Cut away the damaged area and inspect the remaining tubing for stretching, splitting, distortion, or other damage. Make a clean square cut where required by the fitting.
Insert the tubing fully according to the fitting instructions. A partially seated compression connection can appear secure until pressure is restored.
Avoid adding sealants, adhesives, lubricants, or clamps unless the fitting manufacturer specifically calls for them. Improvised sealing materials do not correct a size mismatch or incompatible connection.
Test the Repair Before Backfilling
Leave the repair exposed until it has operated normally under pressure.
Restore water gradually and watch the connection as the line returns to service. If the repair is on a sprinkler lateral, run the affected zone long enough to evaluate both the joint and downstream sprinklers. For drip irrigation, inspect the repaired connection and make sure normal flow reaches the rest of the line.
A dry finger or clean paper towel can help reveal a very small seep around an accessible fitting.
Do not judge the repair after only a few seconds. Allow pressure to stabilize and continue watching the connection.
Then inspect the rest of the zone. Restoring pressure after a major leak can reveal another weak fitting or damaged component farther downstream.
If the repair leaks, shut the water off and correct it before filling the trench.
Flush Debris Before Returning the System to Service
If soil, plastic fragments, or other debris may have entered the line during excavation or cutting, flush the affected section before normal operation resumes.
The method depends on the system. Drip tubing may have a designated flush end. A sprinkler lateral may require an appropriate downstream outlet to be opened or removed so debris can exit without being pushed into a nozzle.
Flush only through a suitable opening and restore the downstream components afterward.
Backfill Carefully
Once the repair has remained dry under normal operating conditions, inspect the excavation one final time.
Remove rocks or sharp debris that could press against the pipe. Place soil around and beneath the line carefully so the repair remains in its natural alignment.
Avoid striking the fitting with a shovel or compacting directly against the joint with excessive force.
If the repair is in an area likely to be disturbed again, record its location. A photograph showing the repair relative to a permanent feature such as a wall, walkway, or valve box can be useful later.
If the Same Area Leaks Again
A second failure in the same location deserves more investigation than the first.
Repeatedly replacing the same coupling can hide the actual cause. The line may be under mechanical stress, the fitting may not match the tubing, roots may be displacing the pipe, or pressure may be contributing to repeated joint problems.
If nearby material has deteriorated, replacing a longer section may be more dependable than continuing to repair isolated points.
Repeated leaks at different locations can also indicate aging materials or a broader pressure issue rather than unrelated accidental damage.
When to Call an Irrigation Professional
Many small drip and lateral line repairs are manageable when the damage is easy to locate and the water can be isolated safely.
Professional help is a better choice when the leaking line cannot be identified, the supply cannot be shut off confidently, the break lies beneath major hardscape, several buried utilities are nearby, or the repair involves unfamiliar pumps, backflow equipment, electrical components, or a continuously pressurized mainline.
Repeated failures without an obvious cause also justify a broader system evaluation.
A qualified irrigation professional can assess pressure, locate less obvious leaks, identify the correct pipe and fittings, and determine whether the visible failure is part of a larger system problem.
Frequently Asked Questions
How can I tell whether a wet spot is really an irrigation leak?
Operate irrigation zones individually and watch whether the wet area changes while a particular zone runs. Water that appears or becomes noticeably worse during one zone can help narrow the source. Wet soil between watering cycles can also point to an underground leak, although drainage and other water sources should be ruled out.
Should I patch a small hole or replace part of the line?
For buried irrigation pipe or tubing, removing the damaged section and reconnecting sound material with an appropriate fitting is usually more dependable than an improvised surface patch. Inspect the surrounding material before deciding how much to remove.
Can I use any coupling that appears to fit?
No. Match the coupling to the pipe or tubing material, actual dimensions, pressure conditions, and intended application. Similar nominal sizes do not always have the same outside diameter.
Why does the same fitting keep leaking?
Repeated leakage can point to poor alignment, incompatible tubing and fittings, incomplete insertion, excessive pressure, pipe movement, or weakened surrounding material. If the same repair fails again, inspect the system conditions rather than installing another identical fitting without further diagnosis.
Fix the Cause Along With the Leak
A good irrigation repair does more than stop visible water.
A punctured lateral damaged during planting may need only a correctly installed repair and a clearer record of where the line runs. A fitting that repeatedly pulls apart calls for a closer look at alignment, sizing, or pressure. A wet area that continues when irrigation is off may require investigation farther upstream rather than another excavation around the nearest sprinkler.
Take enough time to locate the real break, identify the line, expose sound material, choose a compatible repair, and test it before replacing the soil. That approach reduces the chance of reopening the same area later and gives you a much better idea of what caused the failure in the first place.