Most furniture fits through doors and down stairs far more easily in pieces, but only if you can put it back together afterward. To disassemble furniture for a move, photograph each piece first, take it apart in the reverse order it was built, and drop every screw, bolt, and bracket into a labeled bag that stays with the furniture. That system, a few basic tools, and a helper cover most beds, tables, and shelves.
The sections below explain what is worth taking apart, what to have on hand, how to document the process, and when it makes more sense to hand the job to someone else.
What to Take Apart and What to Leave Alone
Take apart anything that will not pass through your doorways, hallways, or stairwells at full size, anything with legs or parts that could snap in transit, and anything too heavy to lift safely in one piece. Leave alone anything that moves fine as it is, or that was never meant to come apart.
Good candidates include bed frames, headboards, dining tables with screw-in legs, desks, tall bookcases, wardrobes, and sectional sofas that split at the connectors. Glass shelves and table tops should come off as well, since they are safer wrapped and carried on their own.
Pieces held together with glue, nails, or staples are different. Old solid-wood dressers and built-in units often rely on joinery that does not release without damage. If you have to force a joint, stop and move the piece whole or get advice.
A quick way to decide is to measure twice. Measure each piece at its widest, tallest, and deepest points, then measure every doorway, turn, and stairwell on the route out and the route in. If the piece clears with a few inches to spare, you may not need to take it apart at all.
Why Weight Matters More Than You Think
Smaller pieces are easier to carry and less likely to hit a wall, but there is also a body-safety reason to take furniture apart. The Canadian Centre for Occupational Health and Safety explains that the NIOSH lifting equation starts from a baseline of about 51 pounds (23 kg). That figure is considered safe for 90% of men and 75% of women only under ideal conditions, and it drops when a load is held far from the body, lifted from the floor, or carried with a twist.
A solid wood headboard or a dresser frame can easily pass that mark. Removing drawers, doors, shelves, and legs turns one risky lift into several manageable ones.
Tools to Gather Before You Start
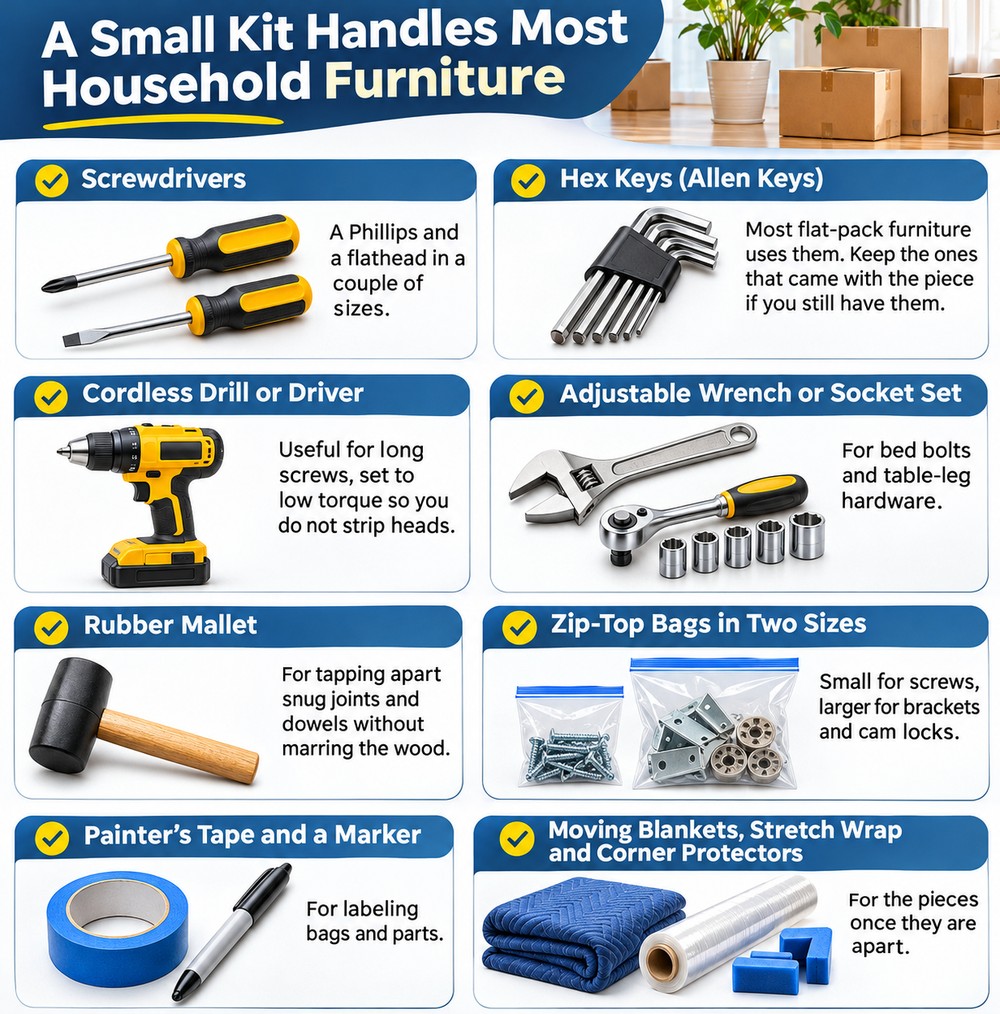
A small kit handles most household furniture.
Photograph Everything Before You Touch a Screw
Photos are the cheapest insurance in the whole process. Take a wide shot of the assembled piece, then close-ups of every joint, bracket, hinge, and hardware location. Include the underside and back, where the important fasteners usually hide.
Where several fasteners look alike, such as six identical bed bolts, photograph each location, and keep shooting as you go.
Store the photos in one album named for the piece, such as “Guest bed frame.” On reassembly day, the album works like a map.
If you still have the assembly instructions, find them now. Many retailers keep manuals online, and IKEA, for example, lets you search its assembly instructions by product name or article number on the product page. Reading the steps first shows you what order the maker intended, which you will reverse.
Step-by-Step: How to Disassemble Furniture for a Move
Work in the reverse of the order the piece was built, and loosen all fasteners a turn or two before removing any. That keeps the frame stable while you work and prevents a loose joint from putting stress on the last few screws.
- Clear and empty the piece. Remove everything from drawers, shelves, and surfaces, and take out loose items such as mattresses, cushions, and glass inserts.
- Remove the removable parts. Drawers, doors, shelves, and hanging rods come off first. Pull drawers out completely and carry them separately.
- Loosen, then remove fasteners. Work from the top down and from the outside in, one joint at a time, bagging as you go.
- Separate the large parts. Lay them flat on a blanket or cardboard so the finish does not get scratched.
- Check for hidden hardware. Look for bolts behind panels, under trim, and on the underside, and for felt pads or glides that may fall off.
Bed Frames
Remove the mattress and box spring first, then slats and any center support beam. Unscrew the side rails from the headboard and footboard, and keep the matching bolts with each rail. Label rails “left” and “right” from the point of view of someone lying in the bed, and do the same for the headboard and footboard.
Tables
Flip the table upside down on a blanket, then unscrew the legs or release the brackets that hold them. Take out extension leaves and carry them separately. Remove glass or stone tops and wrap them well, since they are the heaviest and most fragile parts. A second person should help.
Wardrobes, Dressers, and Bookcases
Take out drawers, shelves, and doors. Tall units often come apart at the top, but check whether the back panel is nailed or screwed. If the frame holds together securely and passes through the doorway, leave it assembled and empty. If the unit is flat-pack, be aware that cam locks and wood dowels can loosen with each assembly, so work gently and do not over-tighten on reassembly.
Sofas and Sectionals
Many sofas have legs that screw off and sections that unlatch. Photograph the connector brackets of a sectional before releasing them, and wrap the cushions separately.
How to Bag and Label Hardware So Nothing Goes Missing
The best hardware system is one where a stranger could reassemble the furniture from the bag labels alone. Use one bag per joint or per component, never one bag per room.
Write on a strip of painter’s tape and stick it to the bag, with a note such as “Guest bed, left rail to headboard, 4 bolts.” Add a quick sketch on the tape if the hardware is similar, or an arrow showing which side of the piece it belongs to.
Then keep the bag with the piece itself. Tape it to the back or underside in a spot where it will not scratch the finish, or place it inside a drawer that stays with the unit. Avoid dropping all bags into a single “hardware box” with a dozen other pieces, since that is where mix-ups begin.
If a screw is stripped, bag it anyway and add a note. A hardware store can match the size from a sample.
How to Wrap and Pack Disassembled Pieces
Wrap flat panels in moving blankets and secure the wrap over the blanket rather than on the finish, since some plastic wrap sticks to certain surfaces. Add corner protectors to tabletops and headboards. Stack panels on their long edges with a blanket between each one, and bundle legs and rails with the labeled hardware bag taped to the bundle.
Reassembling Furniture After the Move
Reassembly goes faster when you reverse the process: open the album, find the bag that matches the piece, and rebuild in the order the photos suggest. Start every screw by hand before tightening, since cross-threading is easy to do and hard to undo.
Reassembly is also the time to anchor tall furniture. The U.S. Consumer Product Safety Commission reported in 2022 that there have been 581 tip-over fatalities involving furniture, TVs, or appliances since 2000, and about 81% of those were children. The agency urges people to secure bookcases and dressers to the wall, so put the anchor kit on your reassembly checklist for any piece taller than it is wide.
When to Leave It to the Crew
Some jobs are not worth doing yourself. If a piece is very heavy, antique, glued together, made of glass or stone, or has complicated hardware, a professional is often the safer choice. The same is true if you are short on time, do not have a second person, or are worried about warranty coverage on a newer piece.
Some local movers include disassembly and reassembly as part of a furniture moving job, and they keep fasteners together so none go missing. For readers in the Phoenix area, one example of this kind of offering is furniture disassembly and reassembly in Phoenix, which covers items such as bed frames, tables, and wardrobes. If you book help, tell the crew in advance which pieces need to come apart and share any photos or instructions you have.
Frequently Asked Questions
Should I disassemble all my furniture before a move?
No. Disassemble only what will not fit through your doors and stairs, what is too heavy to lift safely, and what has parts that can break in transit. Pieces held together with glue or nails, or that already fit through every opening, are usually safer moved whole.
What is the best way to keep screws from getting lost?
Use one labeled zip-top bag per joint, then tape the bag to the piece it belongs to. Write the piece name, the joint, and the screw count on painter’s tape. Avoid pooling all hardware in one box, because mixed-up bags are the most common cause of reassembly delays.
What if I lost the assembly instructions?
Search for the manual online using the brand name, product name, or article number, which is often printed on a label on the back or underside. If you cannot find it, your before-and-after photos and labeled bags are enough for most pieces. A hardware store can also help match missing screws.
Do I need special tools to take furniture apart?
Not usually. A screwdriver set, hex keys, an adjustable wrench, and a rubber mallet handle most beds, tables, and shelves. A cordless drill saves time on long screws, but set it to low torque to avoid stripping heads. Keep the original hex key if you still have it.
Can I take apart furniture that was glued or nailed together?
You can, but you often should not. Glued and nailed joints are designed to be permanent, and forcing them apart can split the wood or leave the piece wobbly. If the piece cannot pass through the doorway whole, ask a professional mover or furniture repair shop before you try.
Plan the Order, Then Take It Slowly
The most reliable move starts with a short plan: decide which pieces really need to come apart, gather your tools, and take photos before the first screw comes out. Then label as you go, bag as you go, and keep each bag with the piece it belongs to.
Reassembly goes quickly when the photos, labels, and hardware are all in one place, and tall furniture is anchored to the wall before anyone relies on it again.