
GPS robot mower setup starts with a clean yard, a well-placed dock, and careful mapping. New owners get the best results when they prepare the lawn before the first run instead of rushing through the app prompts. A few smart checks can prevent weak signal areas, messy borders, missed strips, and unnecessary remapping. Use these GPS robot mower setup tips to create accurate virtual boundaries, protect garden features, and help your mower cut safely, efficiently, and consistently from the start.
Prepare Your Yard Before Mapping
Clear Loose Items, Branches, and Lawn Debris
Before mapping, walk the entire lawn and remove toys, hoses, fallen branches, stones, pet items, and loose garden tools. These objects can confuse sensors, block wheels, or create awkward boundary points during the first route, points out Campus Connection Property Management Lane County. Clearing the yard also helps you see hidden dips, edging gaps, and obstacles that need marking before the mower learns the space accurately during setup.
Trim Grass Before the First Mapping Run
Cut the grass with a regular mower before your GPS robot mower makes its first mapping run. Shorter grass helps the machine move smoothly, keeps the camera and sensors from brushing against tall blades, and makes borders easier to see. Avoid scalping the lawn; aim for an even, manageable height so the robot can focus on learning the layout instead of pushing through heavy growth.
Mark Edges, Slopes, Trees, and No-Go Areas
Identify every feature that could affect mowing before you open the mapping app. Mark lawn edges, steep slopes, tree trunks, exposed roots, flower beds, gravel paths, ponds, pools, and play equipment. Use temporary flags, cones, or stakes if needed. Clear visual markers help you walk cleaner virtual borders and remember where to add no-go zones once the digital map is ready during final setup.
Check Wi-Fi, GPS Signal, and Open Sky Access
Stand in different parts of the lawn and check whether your phone keeps a stable connection to the mower app. GPS robot mowers also need clear sky exposure, especially during mapping. Note areas beside tall walls, sheds, metal structures, or dense trees. These spots may need slower mapping, adjusted boundaries, or a better dock and base location during initial setup.
Place the Charging Dock and GPS Base Correctly
Choose a Flat Spot With Easy Mower Access
Place the charging dock on firm, level ground where the mower can enter and leave in a straight, predictable path. Avoid soft soil, ruts, loose gravel, tight corners, and areas where puddles form after rain. Leave enough open space in front of the dock so the mower can align itself without scraping borders, furniture, edging, or nearby planting each day.
Keep the Dock Near Safe Outdoor Power
Choose a dock location close to a weather-protected outdoor outlet, and route the power cable where people, pets, and garden tools will not disturb it. Use only the approved power equipment supplied with your mower, and keep plugs off wet ground. A safe power setup reduces tripping risks, prevents accidental unplugging, and helps the mower return to charge reliably after each scheduled cutting session without cable strain or power interruptions.
Position the GPS or RTK Base for Strong Signal
Mount the GPS or RTK base where it has open sky access and a stable connection to the mower. Sunseeker Elite GPS robot mowers, for example, pair AONavi technology with RTK, VSLAM mapping, and virtual boundaries; selected models add Vision AI, binocular sensing, iToF, app control, rain detection, OTA updates, 4G anti-theft, 0.5–1.5-acre coverage, 7–14-inch dual-disc cutting, AWD, and 60% to 70%/35° slope capability.
Avoid Walls, Rooflines, and Dense Tree Cover
Do not hide the dock or base under deep eaves, beside high retaining walls, or beneath thick tree canopies. These locations can block satellite signals, weaken communication, and cause the mower to pause, drift, or miss boundary points. Keep the setup visible to open sky whenever possible, and move patio furniture or large planters that crowd the return path before docking and route updates.
Set Boundaries, Zones, and Cutting Preferences
Map the Lawn Slowly for Cleaner Borders
When mapping virtual boundaries, move slowly and follow the lawn edge with steady control. Rushing around curves, corners, and narrow passages can create jagged borders that affect future cutting. Stay slightly inside risky edges near water, steps, or drop-offs. A careful first map saves time later because the mower has a cleaner route to repeat reliably across every scheduled mow throughout the season.
Create Separate Zones for Front and Back Yards
Divide the lawn into practical zones if your property has a front yard, back yard, side strip, or separated grass area. Zones let you assign different schedules, cutting priorities, and mowing patterns for spaces that grow at different speeds. They also help the mower travel more efficiently, with fewer unnecessary crossings and turns, instead of treating the property as one complicated area every day.
Add No-Go Zones Around Beds, Paths, and Pools
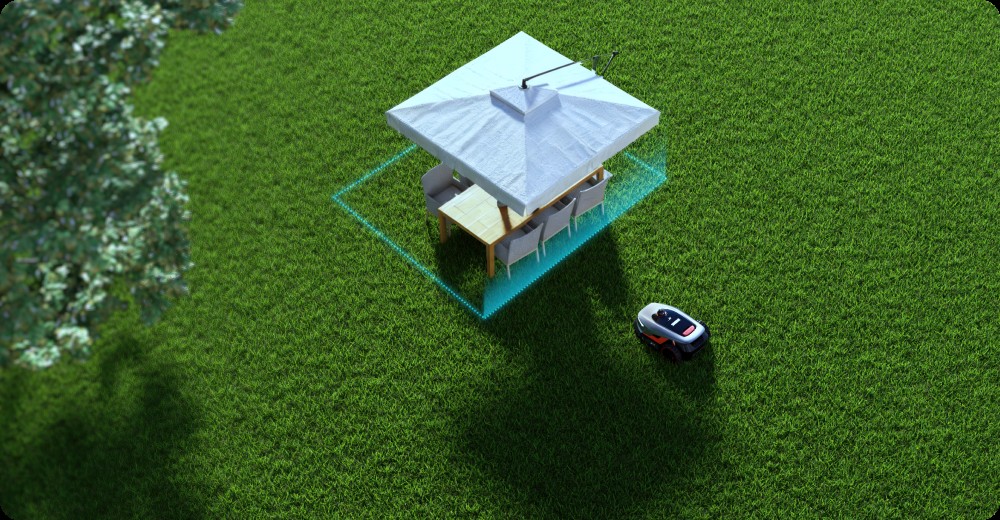
Use no-go zones to protect places the mower should avoid every time it runs. Add them around flower beds, vegetable gardens, mulched trees, gravel paths, fire pits, pool edges, ponds, and temporary projects. Give each restricted area a small buffer, especially near water or loose materials, so the mower turns safely before its wheels reach the hazard during every run.
Set Cutting Height, Schedule, and Rain Rules
Choose a cutting height that suits your grass type and current lawn condition. Start higher if the lawn is stressed, uneven, or recovering from heat. Set a schedule that trims small amounts often rather than removing too much at once. Turn on rain rules or delay settings so the mower avoids slippery turf, clumping grass, and unnecessary wheel marks in wet or humid weather.
Test the First Runs and Fix Setup Issues
Watch How the Mower Handles Edges and Turns
Stay outside with the mower during its first complete runs. Watch how it approaches borders, trees, slopes, passages, and tight turns. Look for repeated hesitation, wheel slip, clipping near obstacles, or areas where it stops too early. These observations show whether the map needs cleaner edges, wider buffers, or small route corrections before you let schedules run unattended.
Adjust Weak Signal or Missed Lawn Areas
If the mower misses strips, pauses often, or reports weak positioning, check the map and signal conditions before changing cutting settings. Move the base if needed, open crowded areas, or remap sections with better sky exposure. For missed grass, adjust the virtual boundary slightly, add a zone, or refine the passage between connected lawn areas for smoother automatic operation.
Save Final Settings After a Smooth Test Mow
Once the mower completes a clean test mow, save the final map, zones, cutting height, schedule, and safety preferences in the app. Name each zone clearly so future edits are simple. Take a few minutes to review alerts, anti-theft settings, and rain behavior. A saved baseline makes later seasonal adjustments faster and safer when the season or lawn growth changes.
Conclusion
A successful GPS robot mower setup comes from patient preparation, accurate mapping, and careful testing. Clear the yard, place the dock and base in signal-friendly locations, build clean zones, and watch the first runs closely. Once the mower works smoothly, save the settings and make small seasonal adjustments. These steps help new owners enjoy dependable, low-effort lawn care all season.